Monday, April 10, 2017

Finished my 25mm Napoleonic Perry "Retreat from Moscow" collection!


Hey all!

Well, thanks to the wife and kids going away for a day or two, I was finally able to finish my latest "bigger" project... my 25mm Napoleonic French "Retreat from Moscow" army, courtesy of the Perry twins!


So, here it is!


Now, I am a planner.  I don't have much in the way of a lead mountain, and I almost always have a finished product in mind when I start a project.  This army is what I was envisioning for this collection... three units of line infantry, three stands of light infantry to match, a unit of cavalry, and then one special unit, the two sleds.  I did want to have a fully functional wargames army, and I was hoping to make the nicest mix of function and appearance out there!:)


The figures are really beautiful.  They are from the esteemed Perry twins, and when I saw them... well, I knew:)


A lot of of character!  I mixed up all the packs they had... cavalry and infantry together, with all sorts of hangers-on and randoms mixed in there, along with dead.


The basing turned out okay... not perfect, but okay:)  I like the grass tufts... I think they help.


BTW, so this entire collection was meant to be my MAIN 25mm Napoleonic collection, after the Russian invasion!  So I made the appropriate accommodations... all of the trays for lights, line, and cavalry are all the same size, so it looks like literally the same army.  Of course, the army looks a bit neater, and the lines are a bit more full, before they get to Russia!


So overall, super happy to finally be finished with them!  That allows me to dedicate to my next project... a fun little Dungeoncrawl beer and pretzels game that should be AMAZING... I've really hit everything about it, from rules to the plans for the look, out of the park:)

Anyway... thanks for coming by!

The Workbench


Hey all!

Well, I finished my last line unit of infantry for my "Retreat from Moscow" collection... now I just have this tray of light infantry, and I am done!

I should have them done soon enough.

And then... that's it!  I might do a single tray of officers for it, and I MIGHT do the Napoleon-on-his-sled from the Perrys, because... well, you know: Napoleon!

Sunday, April 9, 2017

Vikings vs Franks... time for a throw-down!


Hey all!

Well, I had a few friends come by today... the Joes, and my buddy Sean... and we did a little game, so we could push some figures around!

This time it was a swords-and-shields game... Vikings vs Franks.


Here are the Vikings, defending their home (I know, Franks didn't invade the Viking lands much.  Just roll with it.)  Two units of infantry, some berzerkers, some archers, warhounds with their master, and a few heroes.


Here are the Franks... three units of infantry, and two of archers.


Beautiful figures, too... my buddy Sean's.


Here is one of the Frankish heroes, ready for the fight!


And here is the other.


Here you can see the battlefield, from the Frankish side of the field.


The Franks prepare to advance across the field.


The Vikings, meanwhile, leave their camp near the ship and begin to move inland.


The Franks begin to advance.


Another shot, from the Viking side this time.


The Vikings begin to move through the village... I was handling the right flank (nearest to you) and was moving to the hill on the right, while Joe Sr. tool his force off to the left.


My berzerkers lead the advance past the houses...


The Frankish archers move to rocks in the center of the field, preparing to cover both flanks with fire.


Here is a shot from the Viking left flank... Joe Sr. advances his men towards the hill, while on the far side my Vikings move to meet Sean's Franks.


My guys move past the village...


... while Sean's troops move up the hill.


The two sides continue advancing towards each other, and...


... the Viking left flank charges up the hill into combat!


Meanwhile the Viking right moves up the hill...


Here is a shot of the whole battlefield.


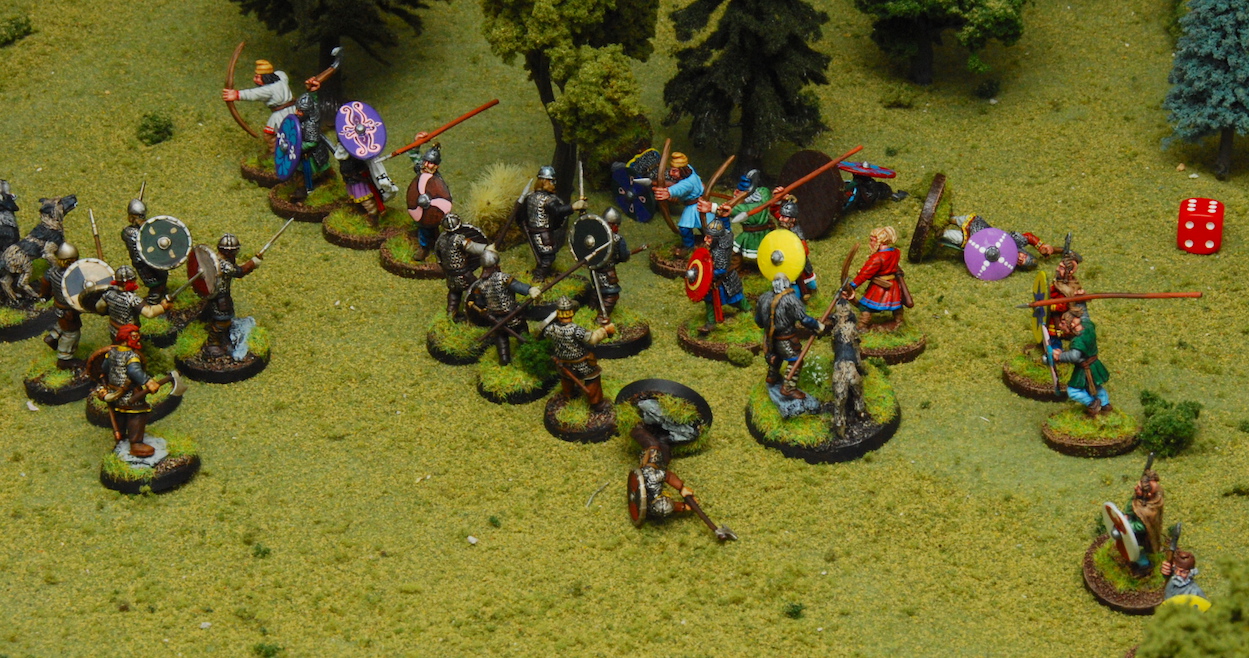
The Viking left is a mess!  Axes and swords cleaving, spears thrusting, shields splintering...


... and the lines beat each other back and forth, Joe Sr. vs Joe Jr.


Meanwhile, on the right, my guys rush up the hill and smash into Sean's Franks.


They begin hacking each other down.


The fight on the left continues unabated, with more and more men falling under the frenzied attacks.


On the right the fight continues on the wooded hill. More and more men fall dead, and the two sides begin to falter.


Finally the surviving Frankish troops on the right are pushed down the hill, and begin a tactical withdrawal towards the center, where the archers await.


The fight on the left begins to turn against the Vikings... more and more Norsemen fall under Frankish weapons.


In the center the Vikings chase down the retreating Franks, but the archers leap into the fight, along with a few troops from the reserve on the flank.


On the left the Vikings fall one after another, until only the Viking hero is left!  Surrounded, he hacks and slashes at everyone around him.


In the center the Franks get pushed back again, but the Vikings start to lose steam.


The last Viking on the left flank finally falls, surrounded by nearly a half dozen Franish enemies.

It was right around here that it ended, as there were only a few Vikings left in the center, who finally turned tail and ran!

Overall, a fun afternoon of hacking and slashing!

A bunch of 15mm Battle Valour Dwarves painted!


Hey all!

Okay, so I know I mentioned this project after Cold Wars, but I've gotten started on my newest project!

So, at Cold Wars, I found a table of 15mm Fantasy figures from Battle Valour.

Now, I am not really a fantasy player, but when I saw the figures... wowzers.  They were BEAUTIFUL sculpts.  Just f'ing beautiful.  And the variety!  There were a dozen different races, each with bunches of different units.

So, I fell in love.  Right away.  And promptly bought a selection of dwarves to paint, because... they looked awesome:)

Here are the first few stands finished!

Now, I am not basing them the way you need to for Battle Valour's game, because I doubt I'll ever play, and I didn't really want to do a ranked up army; I have a lot of those already:)  I just wanted to do a quick skirmish-y looking force.

I bought a half pack of Dwarian axemen, a half pack of Dwarian Forgiven, and a character pack.  I've gotten a few of the characters painted (warlord on the bear, and the king being carried by his bannermen) and some of the axemen and forgiven... and damnitall, they just look SO so sharp!

(BTW, as an aside... be sure to note that some of the ranges at Battle Valour have two pages.  I JUST noticed that for the first time:) )

Anyway... if you want a fun project, check out Battle Valour... they are BEAUTIFUL figures.

And I've got another project using them coming up soon... I'll have more info soon:)

Sunday, April 2, 2017

A game of Armada


Hey all!

Well, a buddy came by a little bit ago, and we got a game of Star Wars: Armada in!


Now, we really just play to have big battles, and as usual, we played without any objectives... we just did a straight up brawl!

I went with Jerjerrod and a Rebels-themed list, with the idea that this is some force way out on the Outer Fringes, without all the modern tech... a kitted out Venator (ISD2), an Arquitens with enhanced armaments and blast doors, and some Gonzantis, along with some random TIEs and a Rhymerball of sorts (the first one I've ever used!)  He took an Assault Frigate, several CR90s with the turbo laser route circuits, a few transports kitted out for squadron commands, and a HUGE swarm of X-Wings, A-Wings, and ARCs (which he used as Y-wings.)


Well, he sent the two CR90s around the flanks and put out a screen of bombers, keeping his ships behind them.  I sort of trundled forward towards them.


Here you can see my Venator lumbering forward.


His CR90 sweeps towards my Arquitens, but I throw a Decimator out to deal with it... the Decimator did a good job all game!


He used his Assault Frigate and Transports to push his fighters forward.


He did take a VCX-100, which was amazing at throwing random fighters forward to clog up my advance... a few A-Wings in particular did a good job at that!


His CR90 that went around the flank, however, ran into my squadron-activated Rhymerball, and thanks to some lucky rolls (the dice favored me ALL NIGHT, and did my buddy NO favors) the Corvette got blasted apart!


Here you can see his squadrons all pushed forward into my ships...


I had a hard time getting the Rhymerball back to the fore, but my anti-squadron dice slowly but surely chipped away at his massive horde of squadrons.


The Venator was moving super slowly (I was trying to get as many anti-squadron turns as possible before having to engage the Rebel ships) but the Arquitens did its best to hurt the frigate.


But it didn't last... as the Arquitens flew by, the Assault Frigate blew it away.  My ISD pushed through the fighter screen and started to turn around the station.  My tractor beam did a nice job the whole time at slowing down the enemy ships.


And Jerjerrod was great, as the turn after the one above my Venator turned sharply behind the Frigate.  My squadrons, meanwhile, plinked away at the Frigate, which just couldn't get away as the tractor beam was keeping it slowed down and it kept having to repair to stay alive.  I made a few HUGE and clumsy mistakes that let it survive two extra rounds as I missed where it had shields and aimed at the wrong arcs with my squadrons... it had one hull and nearly no shields for two whole turns!:(


But eventually I blasted it, and the remaining Rebels jumped to light speed to escape!  Above is my surviving fleet.

Overall a fun game... I was surprised I came out ahead, as it looked bad for me, but I think the dice gods REALLY favored me this game:(

Anyway... my friend ordered two entire Clone Wars fleets from Shapeways, so hopefully they'll be making an appearance on the blog soon enough!

Thanks for stopping by!