Friday, December 31, 2010

Harry Potter in 25mm... finished


Wow.

Finally done:)

Well, as anyone who has read anything on this blog in a while already knows, I've been working for some time on my wife's Christmas present... a set of Harry Potter miniatures in 25mm scale.

Now, there are no such miniatures around, so in a VERY kind move Soapy decided to clear enough space to take on the job of crafting the three main heroes of the books and films... Harry, Hermione, and Ron.

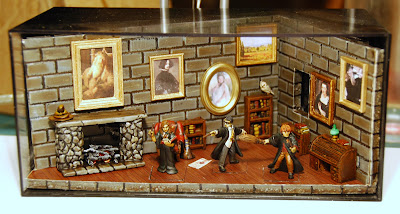
After a few months they got here just a few days ago.  In the meanwhile, I worked on creating a display base for the miniatures.  I wanted it to really be a beautiful piece, and really went beyond any previous work.

The display base had a few firsts for me:

1)  It was the first piece I have done in a plastic display case, requiring me to plan and matte out a large portion of it.

2)  It was the first piece that used electricity and lights... the fireplace was done using a fire LED kit that considered of three different LEDs, along with a painted piece of celophane.  I had to not only wire it all up (very simple!) but also make it able to be turned on and off with a switch I worked through a hole on the side.

3)  It was the first time I've had to match bases exactly up with a floor pattern.  The floor, which is a patterned piece of paper, really worked out well.

4)  It was the first time I had a window scene with an attempted secondary light source, so that it really stood out.  Above the windows but OUTSIDE of the wall is an opening for light... that way the outside feels lit independently (i.e. by the moon) and is not dependent on the main light source!

5)  It was the first time I've tried to paint something that is invisible!  The Invisibility Cloak, which is draped over a large armchair, was a real challenge.  Sculpted out of green stuff, I had to paint it in such a way as to give the impression of invisibility... not an easy feat!  I settled on the angle I thought it would get the most views (dead on) and then tried to paint a shelf and book through one part of it, along with some impression of brown floorboards and the pattern of the chair itself.  This was a SERIOUS challenge, but I think worked out fine.

Note The Marauders Map sitting on the floor... as a reader suggested, it looks almost as if the cloak and Map were being used on some nefarious night mission...!:)

And lastly...

6)  It was the first time I had to paint commissioned figures... better not screw it up!


Hedwig the Owl was a later planned addition, and only made possible by a donation of a GW Owl from Lloyd in Sweden!  He sent it across as a bit from his son's GW Dryad set, and it just fits in perfect.  Above Hedwig hangs a painting my wife and I bought on our last trip to Italy, which hangs in the center of our dining room.

 
The Sorting Hat, which sits under a portrait of Professor Dumbledore asleep (clearly after his death) was made with green stuff, and turned out really sharp.  The fire also turned out awful sharp.

Now, when they finally arrive, the three figures looked pretty good!


Harry was excellent.  The hardest part was capturing his good will in his face... the glasses, which in real life do not obscure his eyes, really made it tough to paint convincing eyes, which I think are essential to really getting a character across.  The casually untucked shirt and the loose tie really help connect Harry to his "prep school" roots at Hogwarts.


Hermione I thought was the best.  The hair of the sculpt really connected the piece to Emma Watson, who is the first person you think of when you visualize the brainy heroine.  I made sure to write, on the cover of her book, "Spells & Charms"... she is clearly ready to rock!


Ron looks excellent.  With his red sweather (A Weasley sweater?  A Gryffindor sweater?), along with his broom from his later Quidditch adventures, really helps tie the character together.

Here are a few random shots....

A shot of the cover of Hermione's book... "Spells & Charms".


A shot over Hermione's shoulder, showing both the writing in her book as well as the scrolls in her pouch.


One more shot of Hermione...


A shot of Harry from the front... the scar was SO carefully sculpted it was crazy:)


A shot of Ron from the side... he is a very dynamic figure, really looking ready to roll, broom out!


Another shot of Ron...


A shot of Harry straight on... notice the Gryffindor patch.
\
So!

A very, very long project, thankfully finished up.  The wife ADORED the gift (her only gift, other than an iTunes giftcard for a few songs and a DVD.)  It was a lot of fun to work on, although waiting for the figures to make their way through customs was NO fun at all.  Overall I am happy that she now has a one-of-a-kind set of 25mm Harry Potter miniatures, unique in the world.

Anyway, thanks so much for stopping by... I hope it was an enjoyable project to follow!

Almost there...


Just need to let the dip dry further, then some varnish, onto the stands, and we are done!  Here is a teaser...

Thursday, December 30, 2010

Harry, Ron, and Hermione all painted... now to dipping!

Okay, the trio is done!

 
I had to do a mockup of the Gryffindor patch on their robes... I think they turned out pretty good.  I didn't want to get TOO detailed... just enough to suggest the patch.

Hermione really came out especially awesome... it is hard to see the colors as they look in real life in the photos, but the face just looks EXACTLY like Emma Wastson... it came out great.  Ron looks pretty darned good too, although a bit serious maybe, and Harry looks much better now that I painted around the arms of his glasses more tightly... it makes them look thinner and more wire-rimmed... they looked a bit chunky before, and made him look more like Elvis Costello.

Now they are going into the dip... then a few days of drying, the matte varnish, onto the stands, the wife's gift is DONE! 

I really wish I could get it ready for New Years Eve, but realistically I don't think they will be dry in time... what can you do.

I've actually painted up a few crappy figures in similar colors to use as test dummies for the varnish... I am NOT losing these guys if I can help it.

Hermione done!

Pretty happy with how she turned out... really looks like Emma Watson.

Here is a shot of the real thing... not too shabby of a likeness, I don't think!

Ron is almost done too!  I should have more up soon...

Huzzah!

Okay... Harry is done first...

Here you go!

I am planning to dip the figures, so the shirt and tie will get some detail... for example, you can't tell here, but the back-piece of the tie is on the lefthand side of the tie there... that is why there is a part that is just yellow.

The eyes are REALLY hard to do... they don't look great in these photos (the shot of his face is from the WORST eye angle, but I wanted to show the scar) but they look pretty good in real life.

So!  Harry is largely done!  I am working on Ron and Hermione now!

Harry and Co. arrive!
They finally made it!

Undercoat is drying, and I should have them done by tonight!:)

Wednesday, December 29, 2010

Harry Potter display base finished!


Well, the Harry Potter display base is done!

Now, Harry and Co are not here yet (and lord knows might NEVER make it... Soapy tried to find them in England but there was no luck... who the hell knows if they will EVER make it here...)

But in the meanwhile, at least the base is done!

So, I took the photos without the front on, because of the glare.  I masked out the parts that needed to be exposed, and then used black spray to spray the box.  I left a hole in the top (masked with tape) outside and above the window so that light could come into the display and light up the moon scene independently... otherwise, you would catch a shadow from the window on the moon, which obviously doesn't make sense!

To the above right you can see a shot of the scene assembled, with the cut-out for the light to light the "outside" scene.  To the the left is a "behind the scenes" shot of the moon scene... you might get a decent look at the finished product in the picture at the top of this entry.

You can also see the fireplace lit up above... the fire was made using this kit.  It was super easy to hook up.  The hardest part was figuring out what to do with the on/off button.  I wanted to attach it to the box itself, but still needed to be able to get the whole scene out in order to change the battery.

The first attempt to cut a hole for the button didn't work so well... using a drill split the box.  However, I DID experiment for a bit with the broken box, and found that simply "drilling" it out with a hobby knife did the trick!  So, drill I did!  To the right you can see a shot of the button itself... to the left, a glimpse at the "backstage" wiring... simple stuff!

Otherwise there is not much new to note... the paintings turned out pretty good... one of Dumbledore, one of The Fat Lady, one of Harry's parents... then a copy of a painting from our dining room that we bought in Italy, and two portraits from the Uffizi that fit the style.  Sorting Hat on the mantle, Marauders Map on the floor, Invisibility Cloak over the chair, Hedwig on the back bookshelf... I would tell you where I got the bookshelves and all except A) the guy at the place I bought them was an ass, and B) I actually don't remember the name of the place.

So!  Harry Potter display base done!  Now if only the damn figures would get here... fingers crossed that SOMEDAY they'll f'ing show up.

Oh, and I just noticed a scratch on the front cover.  Oh well.  I can go pick up another box whenever... they only cost two or three bucks.  Nuts.

Latest work on 10mm Napoleonic Spanish buildings...


Well, here is the latest on my 10mm Napoleonic Spanish buildings... and now I have to take a break:)

I am doing two new farmsteads, one totally enclosed (and having a church in it...)  The other is a large farm building with some open walls... I will finish it with hedge.  I plan to do a veggie garden in the open space in the center.

In addition, I did a small orchard, using the same walls... I spaced the trees apart enough that a stand of infantry will fit between the trees.  Overall I think it will be a good looking piece.

I also did two wall sections that I can use along roads and the like... I figure that I can put a piece of bush or something in between them and whatever I am connecting them to.

I went ahead and also plastered them in, and sanded the paths... tomorrow I'll sand them down and spraypaint them.

Tuesday, December 28, 2010

A better photo of my first finished 10mm Spanish building...


Just thought I'd get a better shot of my first 10mm Napoleonic Spanish buildings... here are some voltigeurs holding the farm.  I hope this shot is a bit better; the last few I took just didn't do the building justice:(

Finished up the Old West Civilians... next up?


Hey all!

Well, finally got a dullcoat on these guys, and they look pretty much done!  I need to pass them on to my buddy to base, and they'll be ready to occupy their town!

I wish I had more of these guys to paint, they are a LOT of fun to do.  I don't, however... so I think I'll start in on some more of my 10mm Spanish Napoleonic scenery.

Good times!

Sunday, December 26, 2010

Some 15mm Cowboy civilians, and a neat Christmas gift!


Howdy all!

Well, on a snow-bound night, I thought I'd get a little painting done... namely, these 15mm Old West civilians for a buddy of mine... I asked to paint five cowboys and he required that I paint five civis along with them:)  So be it!

Overall I think they turned out nicely... really, I've found with these guys that basically I just need to go through scorched brown, bestial brown, snakebite leather, and then grey and bleached bone... and that's it.  Back in those days you wouldn't have too many crazy colors... I limit the brighter colors to the occasional bandana, and of course the lady's dress in this shot.

All they need now is dip, and basing, and they are done.

Also, a neat Christmas gift, from my wife's best friend (who is a SWELL lass!)... a $25 gift card to Battlefield Terrain Concepts!  Good stuff!  I'll have to think about how to get the most out of it... any suggestions?

Friday, December 24, 2010

Some stunning 25mm ACW photos


Howdy all!

Just yesterday I dropped in at a buddy's house to take a bunch of photos of his ACW set-up so that he can get it off the table and can move onto the next collection.  So I thought I would share!

What is insane is that he didn't even have to take any troops out of his shelves for these shots... he has something like 80 units a side, and started this table empty... he just painted units and then put them on the table.  It is pretty ridiculous.


Also, here are a few shots of the non-ACW or AWI shelves... here is some of the 15mm WWII stuff...


And some 25mm WWII...


And yes, even an old school Warhammer Empire army... my buddy couldn't buy a Fantasty figure, but finally accepted Empire because at least they were human and vaguely realistic.


And here is what is taking the place of the ACW stuff... the 15mm Western stuff...